It may seem like preaching to the choir to suggest this, but miking a group of singers should be approached with care and consideration. It’s not a case where you can throw up a few mics and be done with it (well, you can, but it’s not going to help the situation). There’s a string of parameters to be taken into consideration, from the kinds of mics and patterns employed to their placement around the choir. With that in mind, we turned to Todd Foster of Audix Microphones, who shared some choir miking tips.
First off, before cracking open the facility’s mic locker, what sorts of mics and patterns should be considered? Condenser microphones with cardioid polar patterns are the way to go when it comes to capturing a choir, perfect for large groups due to their pattern control. As for dynamic mics, “Individual dynamic microphones are a great choice for miking soloists in a choir, but aside from this, they’re not sensitive enough for the distance miking requires on a choir,” said Foster.
A cardioid polar pattern is the preferred choice because it will cover a wide area, capturing multiple singers if placed and angled properly, but are any other patterns appropriate to use? Occasionally, according to Foster: “When working with a high stage volume, and/or there’s loud sound sources such as an acoustic drum set, organ or an undesirable reflective surface near a choir, a hypercardioid capsule can be used to further focus the microphone’s pickup area on the singers and reject more of the nearby sound. In this case, the microphone can be placed slightly closer to the choir to further reject the unwanted sound.”
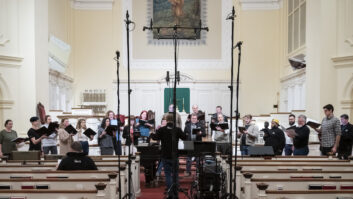
When it comes to placing microphones around a choir, the mantra is the same as in real estate: Location, location, location. Placing a microphone at the right distance and height to best capture a group of singers is crucial. A number of factors come into play at this point, beginning with the 2-Feet/2-Feet Rule. “As a starting point, we recommend placing the microphones 2 feet in front of the first row and 2 feet higher than the tallest person in the back row,” said Foster. “This provides equidistance from the front row to the back row, giving even coverage of the choir.”
For a typical two- to four-row choir, choir mics will likely be 10-12 feet in the air as a result, and should be angled downward toward the singers; picture a 60-degree cone emanating from the mic in order to envision how many people it will cover. Once the choir starts singing, listen and be willing to adjust the mics’ placement in order to ensure that everyone’s covered.
Once the first microphone is in place, then its on to the next step. “One of the most common mistakes when miking a choir is using too many microphones, which can cause feedback and phase problems,” said Foster. One way to avoid that scenario is to apply another rule of thumb.
“The 3:1 Rule basically states that, when using two microphones on an audio source, one should measure the distance from the first mic to the audio source, then place the second mic at least three times that distance from the first mic,” said Foster. “The same rule applies to each additional mic added to the same source. The purpose of the 3:1 Rule is to reduce the effects of phase cancellation, which occurs when a sound arrives at two or more microphones at a slightly different time, resulting in a decreased overall level. If the signals are 180 degrees out of phase, the result will be total cancellation. Active noise cancelling headphones are a good example of how this phenomenon is used to reduce outside noise in environments like airplane cabins.
“With a complex sound source like a choir, what typically occurs is a reduction of some frequencies, and an increase in others. This is known as comb filtering due to its resemblance to a hair comb when viewed on a frequency response plot. Comb filtering results in thin, unnatural and unpleasant sounding audio, so the sound engineer might increase gain and/or look to EQ and compression to bring the level of the choir up and correct the sound. However, doing this can create much greater potential for feedback problems.”
Foster noted that when the 3:1 rule is applied, the second mic still captures the source; however, due to the distance, it is at a much lower level. That reduces the audible effects of phase cancellation and provides richer, more natural audio, so application of the 3:1 rule will result in a need for fewer mics.
With that in mind, how many microphones should be used? One for every 20 singers. This will result in less mic interaction, fewer hot spots or doubling, and fewer feedback issues. This remains true, regardless of the size of choir; in fact, as Foster noted, “With a large choir, there is a tendency to feel as though a large number of microphones are required; however, this only exaggerates the problems we just mentioned.”
While there are many accessories for hanging choir microphones, not every worship space is suitable for that approach. The reasons can be numerous—say, wiring issues or aesthetics, or perhaps the congregation uses a shared or temporary space where hanging microphones from the ceiling simply isn’t an option.
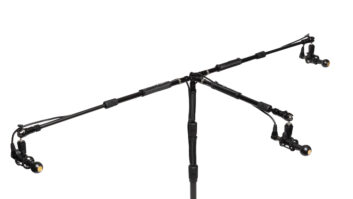
In these cases, Foster suggested, “You can use a mic stand to position microphones accordingly. We recommend using the Audix MicroBoom, which has a carbon fiber boom in various lengths that allows for precise positioning of the microphones, and can easily be repositioned for other choir configurations. Since it’s not permanently installed, it can easily be struck from the stage when no choir microphones are needed.”
After some trial and error in terms of finding the best positioning for your microphones, sound reinforcement for the choir should improve. If the choir needs to be recorded, however, should you change or supplement your miking in order to best capture singers? The live mics themselves don’t need to be moved and can be used for the recording process; the previous placement suggestions still stand. Nonetheless, supplementing them isn’t a bad idea.
Foster had some suggestions about how to employ additional microphones to capture the natural ambiance of the room and the audience. “Ambient miking is comprised of two or more microphones placed at a distance from the source; this is then mixed in stereo to provide spatial imaging, or width to the recording. Two identical choir microphones or other small diaphragm condensers with a cardioid pattern such as the Audix ADX51 may be used for ambient miking. Start with two of the same model cardioid microphones set up in one of the following stereo configurations:
1. X/Y pattern (capsules facing towards each other as close as possible without touching, at a 90-degree angle),
2. Spaced Pair (3-10 feet apart, capsules facing the stage), or
3. NOS near-coincident pair (capsules 30cm apart, and angled 90 degrees apart from each other) placed on a stand above head-height near the rear third of the building.
“Be willing to experiment with placement as each room will present unique benefits and challenges,” he concluded. “It is both a live sound and a recording engineer’s job to accurately capture and reproduce the choir. This all starts with the selection of a high-quality microphone and its proper placement.”
Audix
Audixusa.com