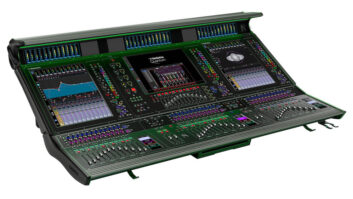
These past few weeks have been quite action packed for me. I drove to Long Beach to demo the DiGiCo SD9 at a local DiGiCo dealer in mid March. I should state that I didn’t actually demo the SD9 itself as they didn’t have one available. However, we did an in-depth look (with some virtual soundcheck mixing) on both the SD8 and SD11, the commonalities and differences between them and how the SD9 sits in the range between them in price and feature-set. All of these consoles run the same software. The real difference between these consoles is the work surface, and how many features are available with the DSP available. With that in mind, let’s dig into the console!

The I/O:
With the SD9, you can connect up to 2 D-Racks. This will give you up to 64 remote inputs and if you also fill the unused output card slots with analogue or AES/EBU cards, you will have 32 remote inputs. The console also has a few AES/EBU input outputs, and eight analogue inputs and eight analogue outputs. This could give you a total of 72 inputs and 40 outputs.
The Software:
I’ll be honest. When I first downloaded the SD9 offline software, I was very confused by it. It is not laid out in a way I find intuitive. For me, that’s going in and setting up the patchbay first, where the inputs and outputs are and how they would enter and leave my console from other equipment in our system. It also means setting up a basic template of what a typical Sunday morning would look like mapped out on this console. I would create all various mixes, groups and matrixes. And it took me a long time to use. It wasn’t until I married the software with the hardware that I realized that the problem wasn’t the software—it was me. I hadn’t seen how to navigate the software on the console to streamline my workflow. Using the touchscreen also helped a bit as using the mouse in the offline software was slow.
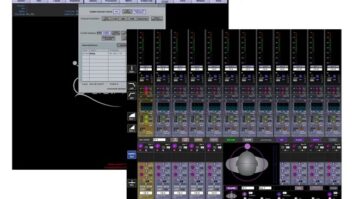
The GUI itself has a Windows 95 feel about it. And what’s more is that they made it so very cramped. The image above shows input channels 1 thru 12. Packed into each channel display shown to the left are several things. First is the channel input. From the channel input, you also select where channel 1 sources it’s audio from, either a physical connection on the I/O or an internal group or matrix. Then you have your high and low pass filters, your first insert point, your EQ section that also has dynamic EQs that can be applied to bands within the EQ. Followed by that is the compressor, then the gate, then you have the second insert point, then you have visual support for your first six auxiliaries. Then you have your panning section; finally, you have your digital scribble strip. Unfortunately, I have fat fingers and each section on the channel is less than one square inch. This meant that I had to be careful about how I used the touchscreen.
Virtual Soundcheck:
Running Virtual Soundcheck on the SD9 is so simple. I would grab the DiGiCo UB MADI which converts MADI coming from the console to a USB that you plug into your computer (or laptop), and your entire desk becomes a giant recording interface for the first 48 channels of audio. And because it’s a simple USB interface, you can use your laptop, PC, Mac, whatever. And then I would probably purchase the $80 license for Reaper recording software. Playing the audio back into the console is simple by pressing the “Listen to Copied Audio” button, which feeds the audio back into the channels to refine your mix or train a new user. The UB MADI has a cost of just over $1,000. But I think that it’s a huge bargain for recording 48 channels!
Plugins:
Like other consoles, you can integrate Waves Soundgrid. It’s expensive, but having the option is a perk.
The Pros:
I do think this is the future of digital mixing. The touch-screen makes interacting with the console a two-handed approach that cuts down on some time. I really like the ease of making virtual soundcheck work on this console. The use of MADI integration is very wise. You can also change what you need this console to do very easily and free up DSP for added effects engines. You have touch-capacitive sensitive faders, eight segment metering on each channel. The channels themselves can be flexible to be either mono or stereo. Hence the name “flexi channel.” All of your bus outputs are flexi as well from mono, stereo or LCR. You also have two separate solo busses and eight macro keys.
The Cons:
My opinion of the software is that it is very un-intuitive. The GUI has a sort of chunky Windows 95 feel to it. I am not fond of the console layout. You are still working in layers, and the virtual soundcheck I was running had me flipping through various layers to set up my control groups, find which layer the lead vocal was on, etc. And given that the layers are split across the two 12-channel fader banks, you essentially have eight layers to navigate. You also don’t have it set up in a way where the 12 channels you are working on align with the touch screen. They are always offset. I get the feeling that my volunteers would be confused by working on this console and in the software.
In all, you may think by this review that I didn’t like the console, but that’s not true. I did like it, but I don’t think its friendly for a “volunteer run, staff supported” ministry, which is the production philosophy of our church. I need to be able to trust that my volunteers can walk up to this console, set it up for the needs of the particular week, lead the band through soundcheck and run a show. If I were working in a church where I and perhaps one or two volunteers were mixing Sunday morning services and all special events in our main room, I would use this in a heartbeat. The console sound was fantastic! Using the channel EQs on vocals and drums were smooth, with no harsh phasey weirdness you sometimes hear in EQ’s. I do believe this is the future of digital mixing. There are so many features packed in. The flexi channels just make sense, the faders are touch-capacitive sensitive, you have dual solo busses, a clear and easy-to-use snapshot system. It’s a shame that this console doesn’t align with the direction of our production, because it has so much to offer, and I’d love to be able to mix on it every Sunday morning.
Jeremy Blasongame is currently a part-time A3 for a concert production company and a Tech Arts Director at Sunridge Community Church. Over the past seven years, he has also worked in two major recording studios and is the author of Church Audio Blog. Feel free to email him at: [email protected] or find him on twitter at@JBsoundguy, or leave a comment below.